Description
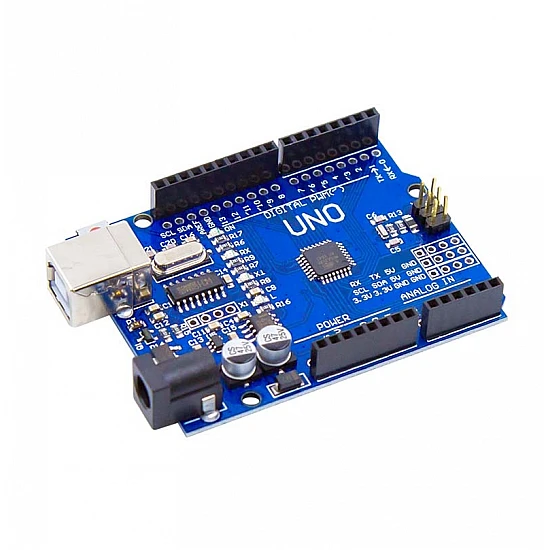
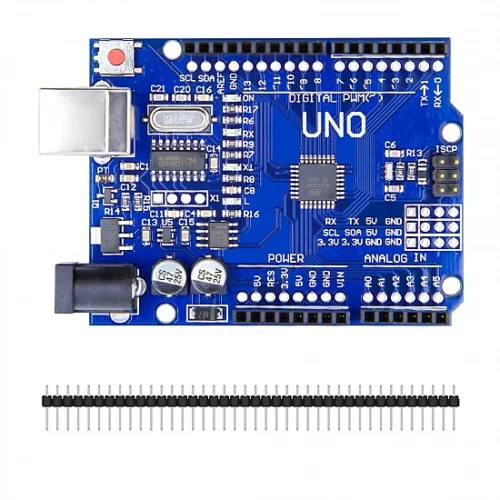
🔧 Arduino Uno R3 SMD – ATmega328P Surface Mount Development Board
The Arduino Uno R3 SMD is a surface-mount variant of the classic Arduino Uno, featuring the ATmega328P microcontroller in SMD package format. This compact version maintains all the functionality of the standard Uno while offering a more streamlined design with surface-mounted components. Features 14 digital I/O pins (6 with PWM), 6 analog inputs, 16MHz clock speed, and USB programming capability. Perfect for production, embedded systems, and projects where the smaller footprint and professional appearance of SMD components is preferred.
✨ Key Highlights
- 💻 SMD ATmega328P – Surface mount microcontroller chip
- 📐 Compact Design – Slimmer profile than DIP version
- ⚡ 16 MHz Clock – Fast real-time processing
- 🔌 USB Programming – Built-in USB Type-B interface
- 📌 14 Digital I/O – 6 with PWM capability
- 📊 6 Analog Inputs – 10-bit ADC resolution
- 💾 32 KB Flash – Ample program storage
- 🛡️ Shield Compatible – Standard Uno form factor
- 🏭 Production Ready – Professional SMD assembly
- 🔓 Open Source – Arduino compatible platform
📊 Technical Specifications
| 💻 Microcontroller |
ATmega328P-AU (SMD) |
| ⚡ Operating Voltage |
5V DC |
| 🔋 Input Voltage |
7-12V (recommended) |
| ⏱️ Clock Speed |
16 MHz |
| 💾 Flash Memory |
32 KB (0.5 KB bootloader) |
| 🧠 SRAM |
2 KB |
| 💿 EEPROM |
1 KB |
| 📌 Digital I/O |
14 (6 PWM) |
| 📊 Analog Input |
6 pins (10-bit) |
| 🔌 USB Interface |
USB Type-B |
| 📏 Dimensions |
68.6×53.4mm |
| ⚖️ Weight |
~20 grams |
🆚 SMD vs DIP Version Comparison
| Feature |
SMD Version |
DIP Version |
| Microcontroller |
ATmega328P-AU (SMD) |
ATmega328P-PU (DIP) |
| Board Height |
Lower profile |
Higher (DIP socket) |
| Chip Replacement |
❌ Requires soldering |
✅ Easy swap |
| Professional Look |
✅ Clean, compact |
Standard |
| Best For |
Production, permanent |
Learning, prototyping |
📌 Pin Configuration
| Digital I/O |
D0-D13 (14 pins) |
| PWM Output |
D3,D5,D6,D9,D10,D11 |
| Analog Input |
A0-A5 (6 pins) |
| Serial UART |
RX(D0), TX(D1) |
| I2C Bus |
SDA(A4), SCL(A5) |
| SPI Bus |
D10,D11,D12,D13 |
| Interrupts |
D2(INT0), D3(INT1) |
| Power Pins |
VIN,5V,3.3V,GND |
🎯 Perfect For
- 🏭 Production Projects – Professional appearance for final products
- 📦 Embedded Systems – Permanent installations, compact builds
- 🛡️ Shield Projects – Clean look with Arduino shields
- 🤖 Robotics – Lower profile fits tight enclosures
- 🏠 Home Automation – Professional smart home controllers
- 🎓 Educational Kits – Teaching SMD technology
- 📊 Data Logging – Environmental monitoring systems
- 💡 LED Projects – NeoPixels, matrices, displays
🔧 Getting Started
| 1. Install IDE |
Download Arduino IDE from arduino.cc |
| 2. Connect |
Plug via USB Type-B cable |
| 3. Board Selection |
Tools → Board → Arduino Uno |
| 4. Port Selection |
Choose correct COM/serial port |
| 5. Upload |
Load Blink example and upload |
| 6. Verify |
Onboard LED (pin 13) should blink |
✅ Key Advantages
- 📐 Lower Profile – Slimmer design fits compact enclosures better
- 🏭 Professional Look – Clean SMD assembly for production
- 🛡️ Shield Compatible – Same Uno footprint, all shields work
- ⚙️ Identical Function – Same code, same performance as DIP Uno
- 💰 Cost-Effective – Often lower price than DIP version
- 📚 Full Compatibility – All Uno tutorials and libraries work
- 🔌 USB Programming – Built-in programmer, no FTDI needed
- 🌐 Same Ecosystem – Massive Arduino community support
⚠️ Important Notes
- 🔧 Chip Replacement – SMD chip requires desoldering tools, not beginner-friendly
- ⚡ Current Limits – Max 20mA per I/O pin, 200mA total
- 🔌 Voltage Protection – Never exceed 5V on I/O pins
- 💡 LEDs Need Resistors – Always use 220Ω-1kΩ with LEDs
- 🔋 Power Options – USB (5V) or barrel jack (7-12V recommended)
- ⚡ External Power for Motors – Use separate supply, not USB
- 📌 Serial Pins – Avoid D0/D1 during USB programming
- 🛡️ No Chip Socket – Chip permanently soldered to board
🔋 Power Supply Options
| USB Power |
5V from computer – programming & testing |
| Barrel Jack |
7-12V DC (9V optimal) – external projects |
| VIN Pin |
7-12V direct – alternative to barrel jack |
| 5V Pin |
5V regulated – bypass onboard regulator |
| USB Power Bank |
5V portable – mobile applications |
🔍 Troubleshooting
| Board Not Detected |
Install drivers, try different USB cable/port |
| Upload Failed |
Check board & port selection in Tools menu |
| Wrong COM Port |
Disconnect/reconnect to identify correct port |
| Code Won’t Run |
Check power LED, manually press reset button |
| Pin Not Working |
Test with simple digitalWrite, check wiring |
💡 Pro Tips
- 🔧 Handle with Care – SMD components more delicate than DIP
- 🛡️ Use Enclosure – Protect SMD components from damage
- 📌 Label Projects – Can’t swap chip easily like DIP version
- 🔌 External Power – Use barrel jack for motor/servo projects
- 💾 Test Before Deploy – Thoroughly test before permanent install
- 📦 Keep Spare – Backup board for critical projects
- 🏭 Production Use – Ideal for final product deployment
- 📚 Same Resources – All Arduino Uno tutorials apply
🛡️ Popular Arduino Shields Compatible
| Ethernet Shield |
Wired network connectivity |
| WiFi Shield |
Wireless internet connection |
| Motor Shield |
DC motor & stepper control |
| LCD Shield |
Character display with buttons |
| SD Card Shield |
Data logging and storage |
| Relay Shield |
High voltage switching |
| GPS Shield |
Location and navigation |
| Sensor Shield |
Easy sensor connections |
🔧 SMD vs DIP – Which to Choose?
- ✅ Choose SMD if: You need professional appearance, lower profile, permanent installation, or production deployment
- ✅ Choose DIP if: You’re learning Arduino, want to replace chip easily, prefer traditional look, or need chip-swapping flexibility
- 💡 Performance: Both versions perform identically – same code, same speed, same capabilities
- 🏭 Use Case: SMD is better for final products, DIP is better for education and experimentation
📦 Package Contents
- ✅ 1x Arduino Uno R3 SMD Development Board
- ✅ 1x USB A to USB B Cable
- ⚠️ Note: Jumper wires, breadboard, sensors sold separately
- ⚠️ Note: External power supply (7-12V) sold separately if needed
- ⚠️ Note: Arduino shields sold separately
🎓 Learning Resources
- 📖 Official Arduino – arduino.cc/reference for documentation
- 💻 Arduino IDE – File → Examples for sample code
- 🌐 Arduino Forum – forum.arduino.cc for community help
- 📺 YouTube Tutorials – Search “Arduino Uno tutorial”
- 📚 Project Hub – create.arduino.cc/projecthub
- 💬 Reddit – reddit.com/r/arduino community
🛡️ Product Information
✅ Arduino Uno R3 SMD – ATmega328P Surface Mount Development Board
✅ SMD ATmega328P-AU microcontroller – professional assembly
✅ 14 digital I/O pins (6 PWM) + 6 analog inputs (A0-A5)
✅ 16 MHz clock speed, 32 KB flash, 2 KB SRAM, 1 KB EEPROM
✅ USB Type-B programming interface – no external programmer needed
✅ UART, I2C, SPI communication protocols
✅ Arduino shield compatible – standard Uno form factor
✅ Lower profile design compared to DIP version
✅ Multiple power options: USB (5V) or barrel jack (7-12V)
✅ Same functionality as standard Uno – identical code compatibility
✅ Professional SMD assembly – production-ready appearance
✅ Cross-platform Arduino IDE support (Windows/Mac/Linux)
⚠️ Important: SMD chip cannot be easily replaced – requires advanced soldering skills. Max 20mA per I/O pin, 200mA total. Never exceed 5V on I/O pins. Use current-limiting resistors with LEDs (220Ω-1kΩ). USB provides 500mA max – use external power (7-12V) for motors/servos. Avoid D0/D1 during USB programming. Handle with care – SMD components more delicate than DIP. Same code and libraries as standard Arduino Uno. All Uno tutorials and shields compatible.