Description
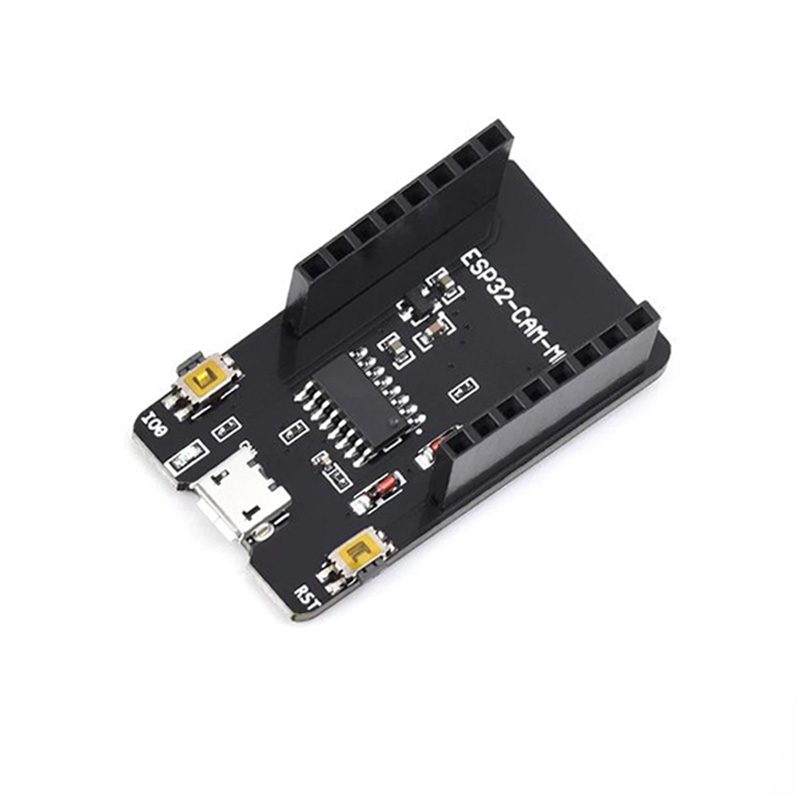
🔌 ESP32-CAM Base Board (MB Programmer) – USB Programming Made Easy
The ESP32-CAM Base Board (also known as MB Programmer or CH340G Programmer Board) is an essential accessory that transforms your ESP32-CAM module into a plug-and-play USB device. This programmer board eliminates the need for external FTDI adapters and manual GPIO0 connections, making programming your ESP32-CAM as simple as plugging in a USB cable. Perfect for beginners and professionals alike, this board features built-in USB-to-serial conversion, automatic boot mode switching, and a stable 5V power supply.
✨ Key Highlights
- 🔌 USB-C / Micro USB Interface – Direct PC connection (variant dependent)
- ⚡ CH340G USB Chip – Reliable USB-to-serial conversion
- 🔧 Auto-Reset Circuit – Automatic boot mode for easy programming
- 💡 Power LED Indicator – Visual confirmation of power status
- 🔄 5V Power Supply – Stable regulated power for ESP32-CAM
- 📌 Pin Socket Connector – Easy insertion/removal of ESP32-CAM
- 🎯 Compact Design – Same footprint as ESP32-CAM
- 🔐 Boot/Reset Buttons – Manual control when needed
- 💻 Plug and Play – No jumper wires or FTDI required
📊 Technical Specifications
| Specification |
Details |
| 🔌 USB Interface |
USB-C or Micro USB (Check variant) |
| 🔄 USB-to-Serial Chip |
CH340G / CH340C |
| ⚡ Input Voltage |
5V via USB |
| 📤 Output Voltage |
5V to ESP32-CAM |
| 💡 Output Current |
Up to 500mA (USB 2.0 limit) |
| 🔢 Baud Rate |
Up to 2 Mbps |
| 🎯 Auto-Reset |
DTR/RTS controlled boot mode |
| 🔘 Buttons |
BOOT button, RESET button |
| 💡 LED Indicators |
Power LED (Red), TX/RX LED (optional) |
| 📌 ESP32-CAM Socket |
Female pin headers (press-fit) |
| 📏 Dimensions |
~50mm x 27mm x 12mm (with ESP32-CAM inserted) |
| ⚖️ Weight |
~8g (without ESP32-CAM) |
| 🌡️ Operating Temperature |
0°C to +70°C |
🆚 USB-C vs Micro USB Variants
| Feature |
USB-C Version |
Micro USB Version |
| Connector Type |
USB Type-C |
Micro USB |
| Reversible |
✅ Yes (both sides) |
❌ No (one side only) |
| Durability |
⭐⭐⭐⭐⭐ Excellent |
⭐⭐⭐ Good |
| Cable Availability |
✅ Modern standard |
✅ Widely available |
| Price |
💰💰 Slightly higher |
💰 Standard |
| Best For |
New projects, modern setups |
Budget builds, existing cables |
🔌 How It Works
| Component |
Function |
| 🔄 CH340G Chip |
Converts USB signals to UART (Serial) |
| ⚡ Voltage Regulator |
Provides stable 5V power from USB |
| 🔧 Auto-Reset Circuit |
Automatically pulls GPIO0 LOW during upload |
| 📌 Pin Socket |
Connects all ESP32-CAM pins for power and data |
| 🔘 BOOT Button |
Manual GPIO0 control (if auto-reset fails) |
| 🔄 RESET Button |
Restarts ESP32-CAM without unplugging |
| 💡 Power LED |
Indicates 5V power presence |
✅ Advantages Over FTDI Adapter
| Feature |
ESP32-CAM Base Board |
FTDI Adapter Method |
| Ease of Use |
✅ Plug and play |
⚠️ Requires wiring |
| GPIO0 Connection |
✅ Automatic |
⚠️ Manual jumper needed |
| Wiring Required |
✅ None |
⚠️ 5+ jumper wires |
| Beginner Friendly |
✅ Very easy |
⚠️ Moderate difficulty |
| Error Rate |
✅ Very low |
⚠️ Higher (wiring mistakes) |
| Programming Speed |
✅ Fast (one click) |
⚠️ Slower (connect/disconnect GPIO0) |
| Stability |
✅ Excellent |
⚠️ Can be unstable |
| Cost |
💰💰 Moderate |
💰 Lower (if FTDI owned) |
🎯 Perfect For
| Use Case |
Description |
| 🎓 Beginners |
Learn ESP32-CAM without complex wiring |
| 🚀 Rapid Prototyping |
Quick code iterations and testing |
| 🏫 Educational Labs |
Classroom/workshop projects with minimal setup |
| 🔧 Development Phase |
Frequent code updates during project development |
| 📹 Camera Projects |
Test different camera configurations easily |
| 🤖 AI Vision Testing |
Experiment with face detection algorithms |
| 🏠 Smart Home |
Develop custom security camera firmware |
| 🎥 Video Streaming |
Build and test streaming applications |
📦 Package Contents
- ✅ 1x ESP32-CAM Base Board (MB Programmer)
- ✅ Pre-soldered female pin headers
- ✅ Anti-static packaging
- ⚠️ Note: ESP32-CAM module sold separately
- ⚠️ Note: USB cable may or may not be included (check variant)
💻 Operating System Compatibility
| Operating System |
Driver Status |
| 🪟 Windows 11 |
✅ Auto-installed via Windows Update |
| 🪟 Windows 10 |
✅ Auto-installed via Windows Update |
| 🪟 Windows 8/8.1 |
✅ Auto-installed (may require manual driver) |
| 🪟 Windows 7 |
⚠️ Manual CH340G driver installation required |
| 🍎 macOS |
⚠️ May require CH340G driver download |
| 🐧 Linux |
✅ Built-in kernel support (Kernel 2.6.24+) |
| 🤖 Chrome OS |
✅ Supported (with Linux support enabled) |
🛠️ Getting Started (Step-by-Step)
- 🔌 Insert ESP32-CAM – Align pins and press ESP32-CAM into socket (camera facing outward)
- 💻 Install CH340G Driver – Download if needed for your OS (Windows 7/macOS)
- 📥 Install Arduino IDE – Download latest version from arduino.cc
- ⚙️ Add ESP32 Board Support – Preferences → Additional Boards Manager URLs:
https://raw.githubusercontent.com/espressif/arduino-esp32/gh-pages/package_esp32_index.json
- 📦 Install ESP32 Boards – Tools → Board → Boards Manager → Install “ESP32”
- 🎯 Select Board – Tools → Board → ESP32 Arduino → “AI Thinker ESP32-CAM”
- 🔌 Connect USB Cable – Plug base board into computer (Power LED should light up)
- 📍 Select Port – Tools → Port → Select COM port (Windows) or /dev/ttyUSB (Linux)
- ⚡ Set Upload Speed – Tools → Upload Speed → Start with 115200
- 📹 Open Example – File → Examples → ESP32 → Camera → CameraWebServer
- ✏️ Edit WiFi Credentials – Add your SSID and password in code
- ⬆️ Upload Code – Click Upload button (auto-reset handles GPIO0)
- ✅ Wait for Upload – Monitor progress bar until “Hard resetting via RTS pin…”
- 🔄 Open Serial Monitor – Tools → Serial Monitor (115200 baud)
- 🌐 Get IP Address – Note the IP address printed in Serial Monitor
- 📹 Open Browser – Enter IP address to view camera stream!
🔧 Using the Buttons
⚠️ Important Notes
- 📌 Insert ESP32-CAM correctly – Camera should face outward, align all pins
- ⚡ USB provides 500mA maximum – Sufficient for most operations, may limit high-power peripherals
- 🔌 Auto-reset works 95% of the time – Use manual button method if upload fails
- 💡 Power LED indicates connection – If LED off, check USB cable and port
- 🔧 Base board is for programming – Can be removed after final code upload for standalone operation
- 📱 Not for permanent installation – Use only during development/programming
- 🔄 CH340G driver required on older Windows versions and macOS
- ⚠️ Don’t force insertion – Pins should align easily; forcing may damage pins
- 📏 Adds height to ESP32-CAM – Consider this in enclosure design
- 🌡️ Avoid excessive heat – Don’t run intensive tasks for extended periods while connected
🔍 Troubleshooting Guide
| Problem |
Solution |
| Port Not Detected |
✅ Install CH340G driver, try different USB cable/port |
| Upload Failed |
✅ Press and hold BOOT button, then press RESET, release BOOT, try upload again |
| Power LED Not Lighting |
✅ Check USB cable (use data cable, not charge-only), try different USB port |
| Camera Init Failed |
✅ Ensure ESP32-CAM seated properly in socket, check camera ribbon cable |
| Brown-out Detector |
✅ Use high-quality USB cable, try powered USB hub |
| Serial Monitor Gibberish |
✅ Set baud rate to 115200, press RESET button |
| ESP32-CAM Won’t Fit |
✅ Check pin alignment, don’t force; gently rock while inserting |
| Upload Stuck at “Connecting…” |
✅ Lower upload speed to 115200, use manual boot mode |
✅ Why You Need the Base Board
| Benefit |
Description |
| ⏱️ Saves Time |
No wiring = faster development cycles |
| 🎯 Reduces Errors |
Eliminates wiring mistakes common with FTDI |
| 🔌 Clean Setup |
No jumper wires cluttering workspace |
| 👨💻 Beginner Friendly |
Perfect for first-time ESP32-CAM users |
| 🔄 Reusable |
Use with multiple ESP32-CAM modules |
| 💪 Stable Connection |
No loose wires during programming |
| 📚 Learning Aid |
Focus on code, not hardware connections |
| 🚀 Professional Tool |
Standard tool for ESP32-CAM development |
💡 Pro Tips
- 🔧 Keep base board after deployment – Useful for future updates and debugging
- ⚡ Increase upload speed to 921600 after confirming 115200 works
- 📹 Test camera before final installation – Upload CameraWebServer example first
- 🔌 Use quality USB cable – Cheap cables cause brown-out issues
- 💾 Keep CH340G driver installer – Handy for new computers
- 🔄 Press RESET after upload – Ensures clean start of new code
- 📱 One base board works for multiple ESP32-CAMs – Cost-effective for bulk projects
🛡️ Warranty & Support
✅ Genuine CH340G USB-to-serial chip
✅ Quality PCB with proper voltage regulation
✅ Pre-tested auto-reset functionality
✅ Compatible with all ESP32-CAM modules
✅ Durable pin socket for multiple insertions
✅ Setup guide and driver links included
✅ Technical support for programming issues
✅ Fast replacement for defective units
⚠️ Note: ESP32-CAM module sold separately